In this post i will explain you step by step installation of Weblogic 10.3.3, We will set the environment to support ADF 11.1.1.3 applications and also we will configure the weblogic domain
Prerequisites:1) Download Weblogic 10.3.3 from the following location.
http://download.oracle.com/otn/nt/middleware/11g/wls1033_oepe111150_win32.exe2) Download Application Develop Framework 11.1.1.2 from the following location
http://download.oracle.com/otn/nt/middleware/11g/ofm_appdev_generic_11.1.1.2.0_disk1_1of1.zip3) Download Application Develop Framework 11.1.1.3 from the following location
http://download.oracle.com/otn/nt/middleware/11g/ofm_appdev_generic_11.1.1.3.0_disk1_1of1.zipSection1:
In this Section I will explain you the Installation of Weblogic 10.3.31) At this Step, I hope the above files are downloaded and kept in some location say C:\Softwares. double click wls1033_oepe111150_win32.exe to launch installation. you will see a welcome screen, click next

2) Select the option Create a new Middleware Home and specify the Directory where you wish to install weblogic 10.3.3, Click Next

3) In the Register for Security Updates Step, Just deselect option, I wish to receive security updates and you will get warning message just ignore it and click yes and next.

4) Select the Install Type as Typical and click Next

5) Verify the product installation directories once and click next

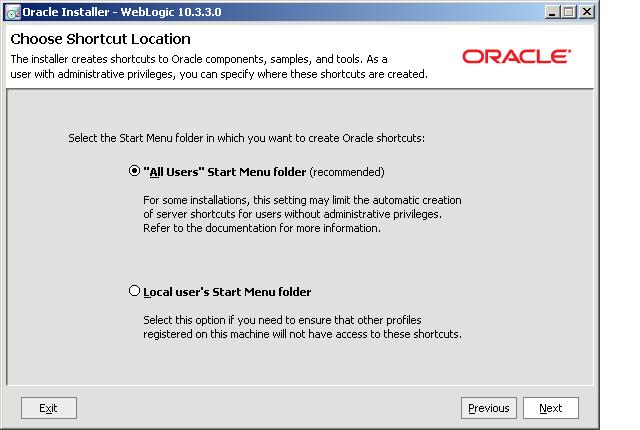
6) Choose the shortcut location and click next

7) In the Installation summary click Next, it will start installation

8) You can see the progress of the installation

10) Please check installation is successful and click done.
 Section 2: Actually to set the Weblogic Environment to support ADF 11.1.1.3, first we need to install application development framework 11.1.1.2, followed by application development framework 11.1.1.3 which will be patch on top of 11.1.1.2. In this Section I will explain you the installation appdev 11.1.1.2 and appdev 11.1.1.3
1) Extract the Zip file ofm_appdev_generic_11.1.1.2.0_disk1_1of1.zip and you will find setup.exe under Disk1 folder. just click setup.exe to launch the installation, As a first step it will ask for the JDK location. copy the JDK location from you installed Middleware home directory and click enter

2) You will see a welcome screen, click next

3) It will run the prerequisite check and click next

4) Specify the existing Oracle Middleware Home directory and click Next

5) In the Installation Summary, Click Install to start the installation

6) You can see the progress of installation.

7) Once the Installation completed successfully click Finish
 Section 3: We need to upgrade the appdev 11.1.1.2 to appdev 11.1.1.3 to support ADF 11.1.1.3 applications in weblogic 10.3.3
1) Extract the Zip file ofm_appdev_generic_11.1.1.3.0_disk1_1of1.zip and you will find setup.exe under Disk1 folder. just click setup.exe to launch the installation, As a first step it will ask for the JDK location. copy the JDK location from you installed Middleware home directory and click enter

2) you will see a welcome screen just click next

3) Specify the existing Oracle Middleware Home directory and click Next

4) In the Installation Summary, Click Install to start the installation

5) you can see the progress of installation, please wait till it finishes

6) Click finish when the installation completes.
 Section 4: Configure Weblogic Domain 10.3.3 for ADF 11.1.1.3 Applications
1) Go to Start -> Oracle Weblogic -> Weblogic Server 11g R1 -> Tools -> Configuration Wizard,
will launch the configuration wizard.

2) Select the option Create a new Weblogic domain and click next

3) In the select Domain Source step: please select Oracle Enterprise Manager - 11.1.1.0 and Oracle JRF - 11.1.1.0 and click next

4) Enter the name of the domain default will be base domain and click next

5) Enter the user name as weblogic and password as weblogic123 and click next

6) In this step make sure you have selected sun SDK 1.6.0 click next

7) In the Optional Configuration Step, Please select Administration Server and Managed Servers, Clusters and Machines and click next

8) In the Configure Administration Server, Enter the Name Admin Server and Port 8001 and click next

9) Configure the Managed Server with the Port 8002 and click next

10) Configure the Cluster as shown below and click next

11) In this step, assign the Managed Server to the cluster as shown and click next

12) Skip the Configure Machines step, and in the configuration summary click create to create the base_domain

13) Make sure the domain created successfully and click done

14) Go to Command Prompt: navigate to the Oracle Middleware Home Directory and the weblogic domain just now created. for eg: D:\Oracle\Middleware\user_projects\domains\base_domain

15) Once the server starts in Running Mode, Open Mozilla Firefox and Open the Weblogic Console using
http://IPAddress:Port/console

 3) Right-click the Model project and select New and In the Gallery select Web Services –> Web Service Data Control then click OK.
 4) Provide a name GetCreditRatingDC and give the URL endpoint for the Web Service, then click Next.
 6) Click Finish, Save your work, the Web service data control is now been created.
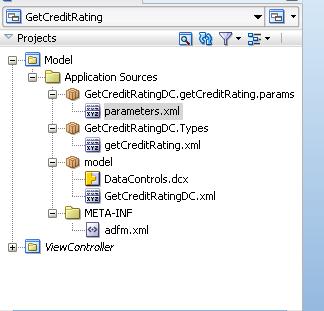
 Next Step is to create the UI components.


 6) In this example I want to get the Credit Rating of the customer based on the customer ID. So Once I enter the customerID I want to execute the request. To do this I need a button.


